This article assumes you are in an entry electronics course and know the basic concepts and operations of the devices in question. This is intended for individuals looking to learn how to automate measurements using NI interfacing hardware with Python.
If you haven’t configured an environment see Setting up your development environment. We will be using the following packages here:
Software
Hardware
This example will be using the Fluke 45 to demonstrate how to collect data via GPIB using the pyVISA module. The address of the Fluke 45 is set to 3. By using ipython we are able to test our connections and commands in realtime and then can build a script later after with ipython magic. You could also use jupyter notebooks for this part as well.
The Virtual Instrument Software Architecture, that allows a consistent interface for communicating over: GPIX, VXI, PXI, Serial, Ethernet, and/or USB interfaces.
- pyVISA documentation
In short, we will
ipython to connect and ensure we get what we expectIf you want to skip this and see the final script head down to Write a simple script for data collection.
The first thing we will do is import the ResourceManager; this informs us of all connected instruments that pyVISA can communicate with.
$ ipython
Python 3.9.2 (default, Feb 28 2021, 17:03:44)
Type 'copyright', 'credits' or 'license' for more information
IPython 8.3.0 -- An enhanced Interactive Python. Type '?' for help.

In [1]: from pyvisa import ResourceManager
In [2]: rm = ResourceManager()
In [3]: rm.list_resources()
Out [3]: ('ASRL/dev/ttyS1::INSTR', 'ASRL/dev/ttyS0::INSTR', 'GPIB0::3::INSTR')
I am running on a linux system, and show that we have two serial ports ttyS*, and one GPIB interface card with an instrument on address 3, 'GPIB0::3::INSTR'. If you had more interface cards installed, then you may see GPIB0, GPIB1, GPIB2, …, GPIBn.
I know I have a Fluke 45 on address 3 so I will set the variable to reflect that and make the code easier to understand.
In [4]: fluke = rm.open_resource("GPIB::3::INSTR")
The important commands for pyVISA are,
.write - Write a command, and expect NO output back (e.g., adc, ‘vdc’, *rst).query - Query the device for information (e.g., *idn?, meas1?, meas?, val?).read - Read after a write command is issued, or multple sets of data are issued. query is more commonly used in lab settings.Let us query the device to confirm it is what we think it is,
In [5]: fluke.query("*idn?")
Out[5]: 'FLUKE, 45, 6070097, 1.7 D1.0\n'
Great! It is a Fluke 45, with some version numbers. Note that commands returned from the GPIB usually have \n characters at the end. In some cases you may need to do some string manipulation, but in python this can be more convenient than other languages. Assuming you have a string s, some useful commands would be .split(...), .replace(...),.subs(…). You can see how those work inipython`.
Some basic things to do when we initially connect to a piece of equipment is to,
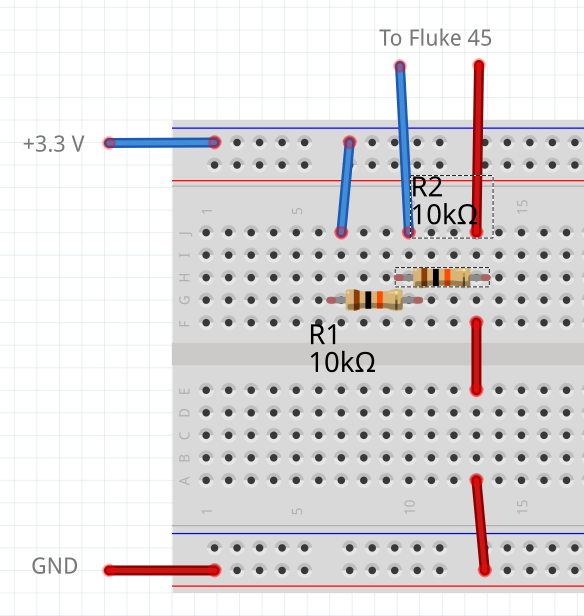
Our simple example we have the Fluke 45 measuring the voltage across R2 of a potential dividedr of two 10k Ohm resistors which is powered by +3.3 V. We will want to ensure the Fluke 45 has the rate set to slow so we can get more precise measurements. See below,
Lets reset and initalize the system,
In [5]: fluke.write("*rst")
In [6]: fluke.write("*vdc")
In [7]: fluke.write("rate s")
Notice here we are using the .write command. This is because these commands do not return any values. You should have heard some clicking as you were issuing the commands, as the device was changing state. Now we are in a state to take some measurements. As I said earlier, the system is already powered with +3.3 V, so we should see some readings on the display.
Lets take a measurement! You have a few options: "meas1?", and "val1?". "meas1?" will give you the next value that was hardware averaged on display 1, while "val1?" will give you the value on display 1 as is.
There is also "meas2?", "val2?", "meas?", and "val?". The last two commands could give resutls from both displays depending on configuration, in my case I know I am on display 1. Just be aware of what these do, and you can reference them in a Fluke 45 user manual datasheet.
Yes, that is a web search, as you may have to go hunting for datasheets for equipment. Generally the manufacturer – in this case Fluke – should have manuals if you navigate through their website.
Onto the measurement!
In [8]: fluke.query("val1?")
Out[8]: '+1.6461E+0\n'
A value! But we do expect back +1.65 V, not 1.6461 V? Parts have tolerances (the resistors), but it is within reason to get this number if the parts are 5% tolerant.
A string output isn’t overly useful, but a float is! Luckily in python, casting this string as a float will strip off the \n.
In [9]: float(fluke.query("val1?"))
Out[9]: 1.6462
In some cases you may have to manipluate the string first before you can cast it as a float or int.
What if we wanted 10 values, once every 0.1 seconds? We can store them into an array and convert them later!
In [10]: from time import sleep
In [11]: data = []
In [12]: for i in range(10):
    ...:     data.append(float(fluke.query("val1?")))
    ...:     sleep(0.1)
    ...:
In [13]: data
Out[13]:  [1.6460,  1.6460,  1.6460,  1.6460,  1.6460,  1.6460,  1.6460,  1.6460,  1.6461,  1.6461]
Awesome! Now we want to write this to a file so we can deal with it later!
In [14]: with open('mydata.csv', 'w'):
    ...:    f.write("Voltage,\n")
    ...:    for d in data:
    ...:        f.write(f"{d},\n"}
    ...:
In [15]:
We now have a file called mydata.csv to use in another script for analysis, or excel or whatever you are comforatble with.
What if we want to do this again – to provide statistics to our experiment – then we would have to rerun the commands above, or write a script. Since we have the basics working we can cheat by using the ipython magic command %hist which shows the history of all commands typed this session.
In [15]: %hist
from pyvisa import ResourceManager
rm = ResourceManager()
rm.list_resources()
fluke = rm.open_resource('GPIB0::3::INSTR')
fluke.query("*idn?")
fluke.query("*rst?")
fluke.query("vdc")
fluke.query("rate s")
fluke.query("val1?")
float(fluke.query("val1?"))
from time import sleep
data = []
for i in range(10):
    data.append(float(fluke.query('val1?')))
data
with open('mydata.csv', 'w'):
    f.write("Voltage,\n")
    for d in data:
        f.write(f"{d},\n"}
%hist
This can be copied into your favoruite text editor and with some small edits, make it more streamlined.
Here is an example of taking the above output from %hist and saved as measure_voltage.py with adding time to each measuremnet.
# -*- coding: utf-8 -*-
from pyvisa import ResourceManager
from time import sleep, time
from sys import exit

rm = ResourceManager()
fluke = rm.open_resource('GPIB0::3::INSTR')

# The identity should be a 'FLUKE, 45, 6070097, 1.7 D1.0\n'
# Quit if it is not
idn = fluke.query("*idn?")
if "FLUKE" not in idn:
    print("Incorrect device connected! Connect a Fluke 45")
    exit()

# Initialize Fluke 45
fluke.write("*rst?")
fluke.write("vdc")
fluke.write("rate s")

# You can use "input" to handle options before the experiment
n_samples = input("How many samples do you want? (Enter an integer): ")
n_samples = int(n_samples)

# Collect my data
x = []
y = []
start_time = time()
for i in range(n_samples):
    x.append(time() - start_time)
    y.append(float(fluke.query('val1?')))
    sleep(0.1)

# Save my data
with open('mydata.csv', 'w'):
    # Write header
    f.write("Time (s),Voltage (V)\n")
    for x_i, y_i in zip(x, y):
        # See the f-string cheat sheet on how this works
        f.write(f"{x_i:0.6e},{y_i:0.6e},\n"}
If you are using commandline (Linux, Powershell, WSL, or the terminal in your editor like Spyder), you can run,
python measure_voltage.py
Or if you are running in ipython you can use the %run magic
In [1]: %run measure_voltage.py
What about measuring current? You could change your experiment setup, and change fluke.write("vdc") tofluke.write(“adc”)` for measuring current from a DC source.
For more intriciate examples, like using a DAQ card, functions/classes and/or including user input or graphical interfaces, see future articles.
You should read the manual of any device for all available commands. Some are extensions and there are too many devices to cover for this article, but this should get you started. Below is an example of what a Fluke 45 user manual shows for GPIB commands.
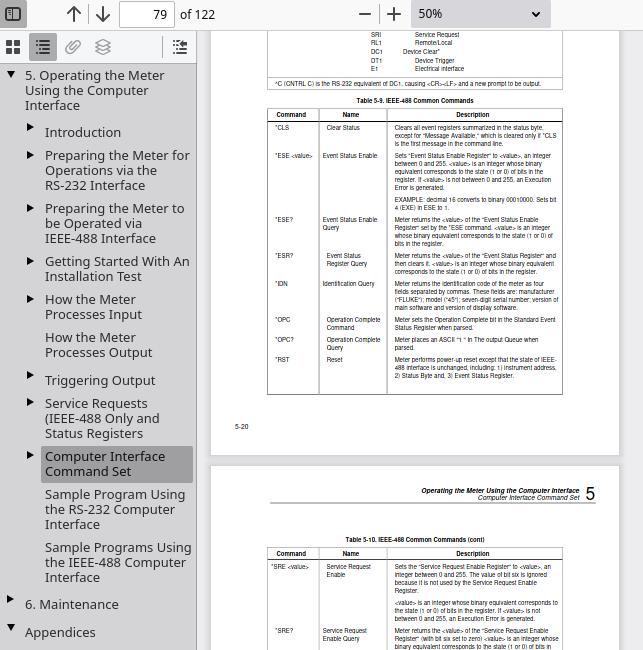
*rst*idn?adc - Set the device to do ADC measurements (Verify probe connections!)aac - Same as previous but for ACvdc - Set the device to do VDC measurements (Verify probe connections!)vac - Same as previous but for ACrate <speed> - range <range> - meas1? - Get next averaged measurement based on rate on display 1meas2? - Get next averaged measurement based on rate on display 2meas? - Get next averaged measurement based on rate on both displaysval1? - Get value on display 1val2? - Get value on display 2val? - Get value on both displays© 2017–2024 David Kalliecharan